

Angular 5 Templates
Angular5 Templates
Introduction
We will talk about some interesting features in Angular that solved many problems I faced before also it will make developing using angular more interesting
If you have used angular before for sure you used one of the angular directives ngIf, or ngSwitch. But in this article, we will talk about ng-template and ngTemplateOutlet directives also are one of the most powerful features in angular.
Most of the time we are using the ng-template and ngTemplateOutlet directives with ng-container, and as these directives are designed to work together and to be used together. We will have to know more about all of them in one go. This will help us to have more context around every directive.
Now let’s start using the ng-template with more advanced use cases and see how things will be better using it.
what’s the ng-template?
The ng-template directive is just an Angular template which means that its content will be a part of a template. We can use it and compose it together with other templates to get one final component template. Also Angular is using the directive of ng-template in many of the structural directives most of them we are using them but we don’t know that like ngFor, ngSwitch and ngIf. We will know next how to use them together and the best practice for that.
I’ll assume that you have an Angular 5 project. If you don’t have create new one using angular-cli
ng new angular-templates
After creating the project in app.component.ts I’ll try to use ng-template in the next example
import { Component } from "@angular/core";

@Component({
  selector: "app-root",
  template: `
      <ng-template>
          <div class="loader">
            <div>{{loadingText}}</div>
          </div>
      </ng-template>
  `
})
export class AppComponent {
  loadingText = "Loading....";

}
Try to run ng serve to see the result
And tadaa, Nothing happens and the screen is empty!
Why does that happen? That’s because the ng-template we just wrote just defined as a template. But we are not using it yet. We will try to use it in the next example.
In the next example, we will try to make this template we defined to be rendered and we will use some of the most commonly angular directives as we mentioned them before.
Using ng-If with ng-template
If you’ve used angular before you must have used ng-if before once at least. So I won’t explain it and I’ll try to focus on ng-template
Here’s the next example
import { Component } from "@angular/core";

@Component({
  selector: "app-root",
  template: `
      <ng-template #loading>
          <div class="loader">
            <div>{{loadingText}}</div>
          </div>
      </ng-template>
      <div *ngIf="data else loading">

      </div>
  `
})
export class AppComponent {
  loadingText = "Loading....";
}
As we can see I used ngIf after the ng-template. You can put it before the ng-template directive as well. And in the ngIf I made a condition to show this div if data exists if not it’ll show the loading template. So it will wait for the data to arrive from the back-end and while that it’ll show the loading template.
I added #loading to the ng-template tag. It’s now the name of our loading template.
So we can now call the template loading at any time we need a loader. This would save a lot of time working with loaders.
In the previous example, we just used the ng-template directive with ngIf. But you can use it with ngSwitch and ngFor also and the same process will occur.
But what if I wanted to use 2 of the directives ( ngIf ,ngFor or ngSwitch ) together?
Let’s see how things will work!
Multiple Structural Directives
In the next example, I’ll try to use two of these directives together.
If we tried to use ngFor and ngIf together in the same tag like this:
<div *ngIf="tasks" *ngFor="let task of tasks">
  <div>
      {{task}}
  </div>
</div>
If you tried to run this code it won’t. and will give you an error.
I mentioned in the first phrase of this article the word problems and this error was one of them. using two directives at the same time in the same element is not possible.
I solved this problem using the next way
But using
<div *ngIf="tasks">
  <div *ngFor="let task of tasks">
    <div>
        {{task}}
    </div>
  </div>
</div>
Now you won’t see any errors. But you have to create new div for the ngIf and put all the other code into it.
And this is the old way to do it. It solves the problem but if you think like me and want better solutions for your code you’d like the next way using ng-container.
#Using ng-container
<ng-container *ngIf="tasks">
  <div *ngFor="let task of tasks">
    <div>
        {{task}}
    </div>
  </div>
</ng-container>
And this solution is better you don’t have to create new div element. All you need is just change the div element to ng-container. this is not the only use of ng-container it can be used as a placeholder for injecting any template into the page dynamically.
#Using ngTemplateOutlet directive
We can use ngTemplateOutlet to create dynamic templates and use them later as references and also point the templates to other directives like ngIf.And use this template anywhere on the page.
<ng-container *ngTemplateOutlet="loader"></ng-container>
As we can see we used ng-container with ngTemplateoutlet to call the loader template and we can use it to call that template anywhere.
#The context of the template
The scope of the variables seems to be complex in many frameworks and programming languages and maybe you asked yourself what is visible inside the template?
So let’s explain how things work in templates. In every ng-template, we have access to the variables which are visible in the outer template. That’s because ng-templates instances have access to the same context where they are. So if the ng-template were in a template where there are some variables the ng-template will have access to all of them.Also, each template can have its own set of variables.
import { Component } from "@angular/core";

@Component({
  selector: "app-root",
  template: `
    <ng-template #tasksTemplate let-listCounter="count">
        <div> The count is {{listCounter}} tasks ...</div>
    </ng-template>
    <ng-container *ngTemplateOutlet="tasksTemplate;context:all">
    </ng-container>
`
})
export class AppComponent {
  listcount = 54;
  all = { count: this.listcount };
}
Let’s break down this example: As we can see this template this time has input variable and it can have more variables if we want.
Also, we could define variable through the template itself using the prefix like what we did with the variable listCounter
If you tried to run the previous code you’ll get
The count is 54 tasks
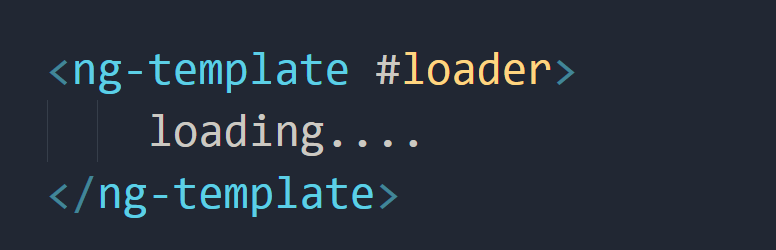
#Template References
We can use the template reference to refer to the loading template. We can also use ViewChild decorator to inject the template directly into our component.
import { Component } from "@angular/core";

@Component({
  selector: 'app-root',
  template: `
      <ng-template #loader>
          loading....
      </ng-template>
`})
export class AppComponent implements OnInit {

    @ViewChild('loader')
    private loaderTemplate: TemplateRef<any>;

    ngOnInit() {
        console.log(this.loaderTemplate);
    }

}
We can inject the template using the template reference name ==loader== to the decorator ViewChild
If you’re wondering about the scope of this templates. It’s the same as the component class’s level
#Working with Template partial @Inputs
You can create configurable components by using the template partial @Input
If you’d like to give your users the ability to configure the look of the component. We should first define the template of that component:
@Component({
  selector: "app-root",
  template: `
  <ng-template #customTemp>
      <div>{{someText}}</div>
  </ng-template>
  <text-container [headerTemplate]="customTemp"></text-container>
  `
})
export class AppComponent implements OnInit {}
And We create new component names text-container and also we will define new property of the input that named headerTemplate
@Component({
  selector: "text-container",
  template: `
    <ng-template #defaultText>
      //
      <div>
          Lorem Ipsum
      </div>

    </ng-template>
    <ng-container *ngTemplateOutlet="headerTemplate ? headerTemplate: defaultText">

    </ng-container>
`
})
export class TextContainerComponent {
  @Input() headerTemplate: TemplateRef<any>;
}
As we can see I defined a template called defaultText. The reason why I created this template is that if the input property was undefined. If not it’ll display the input template.
#Summary
All the directives I mentioned up there are made to give us the ability to create dynamical and more complex components, to solve many problems we will face during development using Angular, to keep our code neat, better and readable.
You can use them in better way and more complex examples than I used.
You can even change the look of the component it will be based on other input templates. You can define a template and use it wherever you want. Using ngIf and ngFor with ng-template tag will give us the ability to solve problems and write less code.
Share this post
Twitter
Google+
Facebook
Reddit
LinkedIn
StumbleUpon
Pinterest
Email